Showing posts with label Dyes. Show all posts

Monday, September 23, 2013

Hair Diary || More Highlights + Finalizing My Adjusted Regimen

So, I think I've mentioned this before, but I was a color freak during my relaxed days.  (And being a color freak during that time usually damaged my hair until I switched over to doing highlights as opposed to full-on dyeing.)

Fast forward to now ... the color freak is back.  She first emerged in late 2010 with the red highlights.  Then she re-appeared this summer with the ombre effect.  Quickly bored with the ombre, which didn't take too well (it looks more pronounced in photos), I decided to do blonde highlights.  Unfortunately, after 50 minutes, the result was a mere copper, but it's growing on me.  I foresee more highlighting in the near future.

As for finalizing my regimen?  I'm currently experimenting with an adjusted protective style routine.  If you've been following me for a while, you'll know that I spent the past few years wearing twists usually every 4 weeks back to back.  Now I'm toying with wearing twists for 3 weeks and an unseparated twist-out for 1 week.  This month is my second run in a row.

And now for more hair pics:

First day in new set of twists.  (Early September.)
Starting week #2.
Twists have shrunken and been washed (using the scalp method).
In the middle of week #2.
Prepping for highlights by undo-ing a few twists near my part.
Highlighted sections are covered with foil to separate from the rest of my hair.
Copper color after 50 minutes.  (Was going for blonde, but hey.
Maximum allowed time on the box was 45 minutes.  I didn't want to go too much over.)
The color I used: "7G, Lightest Blonde".  
I'm toying with using a bleach kit (more effective) in the future but I'm still researching the adverse effects of that.  Clairol Textures & Tones is actually one of the safest dyes when it comes to natural hair. 
My strand test turned blonde.  However, I looked at it after a couple of hours.  I'm not quite sure at exactly what point in time (definitely after 50 minutes though) that it turned this color.
Highlighted sections are twisted back up to blend in with the rest of my twists.


Tuesday, June 11, 2013

Hair Diary || Ombre Color for the Summer

The resulting hair color.
My red highlights from about 2.5 years ago had grown out and faded gradually and so I've been back to my natural beautiful black color (with a few faded sections) for some time.  With summer approaching and my itch for a change intensifying, I decided to dye my ends brown for an ombre effect.  The brown did not come out as light as I thought it would but it is growing on me.  I may or may not decide to go lighter in a few months.  We will see.

Circa January 2011.  My red highlights months were done circa November 2010.
Clairol Textures & Tones is a popular brand among naturals, largely because it does not dry out and damage our strands as other dyes can.  I don't know whether I like the product yet.  We'll see how the color fairs over the next few months.  (I let the color set for 35 minutes before rinsing.) 
This is how I achieved the ombre.
I figured it would be easiest to work from  eight big braids and apply the color to the ends (which I left unbraided).
The result.  It looks more subtle in person.
The result.  The flash enhances the color.  It looks more subtle and less red in person.
It looks more subtle in person.

Wednesday, April 13, 2011

Chapt. III: Maintenance After Highlighting

{Twistout}
Previous Posts:
Chemically Highlight Natural Hair?
Chapt. II: Precautions When Highlighting

____________________

It's been about 5 months since highlighting my hair.  In terms of maintenance, in all honesty, I haven't had to change my regimen.  (It's the same prepoo, wash, deep condition, seal, and twist.)  What I will emphasize is that 1) your hair's condition prior to highlighting + 2) the precautions taken during the process seem to be more important than anything else.  After highlighting, don't slack on your hair care routine.  Some people also benefit from increased protein conditioning.  :o)

Friday, January 14, 2011

Chapt.II: Precautions When Highlighting

Last week, I talked about factors to consider BEFORE chemically highlighting your natural hair.  Please read that post before delving into to this one.

This week, I'll discuss some precautions one should take when highlighting natural hair at home.  If you choose to have the process done professionally, be sure that your colorist knows how to color natural hair and not just hair in general.  I had a friend walk into an Aveda salon and walk out with beautiful color but loosened texture and dry hair.  Don't let that be you.
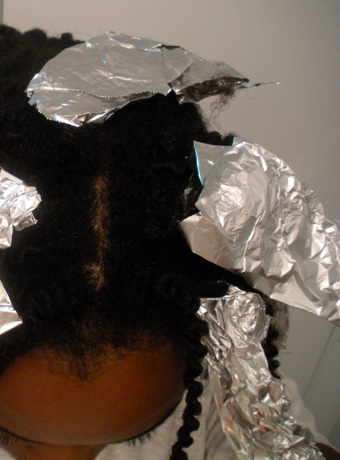
PRECAUTIONS when highlighting at home:

1. Use a commercial kit.  Commercial highlighting kits are designed to yield minimal mistakes.  I have used (in the past) and recommend African Pride HiLites.  L'Oreal Colour Rays (used this time) is also good but TOO strong for relaxed tresses.  Though a few people have had success with hydrogen perioxide as a highlighting technique, I do NOT recommend it (from my own past experience); by the time it lifts the color to a desirable shade, damage is done to the strands.

2. FOLLOW THE DIRECTIONS provided in the kit.  This is the number one precaution one must take above all others.  Many highlight jobs go wrong when instructions are not followed properly.  I've had the experience of my whole hair break off when I left a dye on for 5 minutes longer than stated in the directions.

3. Pre-treat with coconut oil for 20 minutes before highlighting.  I don't know whether this method is effective against chemical damage or merely psychological, but I felt better knowing that my hair was strengthened going into the dye job.  The oil did not interfere with the intensity of the color in my experience.

4. Don't leave the dye on your head longer than instructed.  Actually, it is ideal to leave it on for less time. If the kit says 25 minutes, leave it on for 20 minutes.  If you want optimal color, leave it on for the full 25 minutes but no longer than that.

5. Rinse and wash your hair and scalp thoroughly after the process.

6. After using the conditioner/conditioning shampoo from the kit, follow up with your usual deep conditioner.  This step will ensure that moisture and strength is restored to your strands.  In my recent highlighting experience, I immediately followed up with a 20-minute deep treatment using Lekair Cholesterol mixed with olive oil.

7. Wait about 4-6 months to highlight after a henna treatment.  (See this link.)  After highlighting, wait another 4-6 months before hennaing again.  Some individuals may highlight/henna sooner, but this precaution is just to be on the safe side.

NEXT WEEK ... MAINTENANCE TIPS

Wednesday, January 5, 2011

Chemically Highlight Natural Hair?

{Jordin Sparks}
In late November, I chemically highlighted my hair for the first time since going natural.  After approximately seven weeks, my hair is doing just fine.  How do you know if chemical highlighting is for you?  Well, for one, I DO NOT recommend it unless you have thoroughly contemplated and researched the process, alternatives, and consequences.  Here are some questions worth considering before taking the plunge:

WHAT ARE THE RISKS?
Read this previous post on the chemical process and potential damage from misuse.  Do your own research as well.

WHY CHEMICAL HIGHLIGHTS?
Why do you want chemical highlights?  Can the color you are seeking be achieved by healthier, more natural means (e.g., henna, honey, cinnamon)? What about temporary alternatives (e.g., color extensions)?

IS YOUR HAIR HEALTHY?
If your hair is damaged and weak, I recommend staying away from chemical highlights.  If your hair is healthy, are you willing to suffer any setbacks or consequences that may come with highlighting?  Split ends? Increased porosity?

DO YOU HENNA?
Do you plan to henna after highlighting? Have you hennaed and now plan to chemically highlight?  If so, there are some factors (e.g., length of time between dye job and henna treatment, quality of henna used, etc.) you should consider.  Read this link and do further research.

Stay tuned for a post on PRECAUTIONS, MAINTENANCE, ETC.
{Highlights achieved with a semi-permanent commercial dye.}
WHY I DID IT: I'm an artist at heart, and one of the ways I express myself is through my hair.  I was an avid highlighter before going natural but played it safe after the big chop through now in order to achieve certain health and length goals.  Now that I'm at a comfortable length, I am willing to take a risk and return to highlighting.  The color I chose is a dramatic, loud red versus the subtle, deep red that henna produces.

Ulavu.Com

Labels